December 20, 2011

November 7, 2011

Week 5 - Story Idea and References

STORY IDEA

As a reminder, I'll need the following items on your written story idea proposal next week:

Synopsis - A brief and clear description of what the story is about, who the characters are, what their goals are, and so forth. What are the themes and plot?

Location
and time period - Must be [based on] a specific place that exists! For example, your story may take place during 1820s in London. What matters is that it is referencing a believable place and time even if the time and place in the story is completely fictional. We wanna know the specifics of the culture, economy, type of landscape, weather, the architecture, the fashion, and so forth of the location and time period. Avoid mashing multiple timelines and locations together, try to keep it simple if you can. Be as clear as possible on your location and time period.

Cast
- Describe the characteristics and personalities of your cast members. I am looking for a cast with a variety of age, gender, and size distinctions. I will need the following characters:
  1. "Hero" - the main character, how old is this character,hat is his/her goals, overall look, etc. Flesh out your character physically and emotionally.
  2. "Villian" - antagonist, source of conflict, pretty the same things as above. However, you should consider contrasting this character with the hero.
  3. For the third character, you may choose any from the following: the maiden, damsel in distress, wise-man, mentor, guardian, spirit, fool, trickster, or sidekick. Whichever character you decide on, make sure you consider their goals and personalities.
  4. + 5. The last 2 characters I'll need are background characters. These characters will serve as general populace. Their only purpose is to be part of the scenery. These are meant to be plain characters, but they will essentially bring life into your world. Please note that they should not be too interesting because we do not want them to compete for attention with the main characters. I will need one male and one female for the background characters.
REFERENCE & RESEARCH

Aside from finding reference photos and artists, do some research on other aspects your project. Maybe you'll want to read up on the location during a particular time period. Maybe you'll want to research the fashion, the cultural style of that era. If you're character is going to have props, make sure you look up reference for that as well. For our line of work and purposes, always design from real life. Whatever it is that you decide to design, make sure it has some incorporation of something that exists. The problem that most students run into issues early on is by not utilizing their references to help them design.

Pick a couple reference artists, preferable whose work and style is similar to your project. This way you can turn to the artist's work to help you solve design problems that you may encounter. The goal here is that you find someone who's already have a solid and established style to reference from. When you pick your artists, try reference artists that show strong use of the principles we've discussed in class.

Some artists I recommend are: Carter Goodrich, Chris Sanders, Claire Wendling, Peter De Seve, Nico Marlet, Bruce Timm, Glen Keane, Jin Kim

Good Luck!

October 24, 2011

Week 3 - Stitch Turnaround Copy

Hi guys, sorry for the late post.

Copy the Stitch turnarounds below by doing each step on a separate layer (of tracing paper). Remember to refer back to the previous exercises to help you execute this assignment. It is recommended that you look at Chris Sander's work for reference as he is the designer for Lilo & Stitch.

Technically you can make a successful copy using a grid and by measuring out the line relationships, so you really just mapping out points in a linear fashion. Conversely, by breaking the drawing down into different stages you can turn a linear drawing into a dimensional and substantial drawing. A lot of time character copies turn out poorly because they are missing the underlying structure on which the character is originally built from. The designer is not trying to trick you, he purposely design it in a way so that it can be translated by a team of artists. It might not be easy, but at least it'll be easier if you have an understanding of what you are replicating. If you run into issues, it's probably because you are going too fast.

  • Layer 1 : Draw the height proportion guidelines first. In this case, Stitch is roughly 2.2 heads high with about 1/5th head extending on top and below.
  • Layer 2 : Do gesture drawing, look for rhythmic curves, general proportions, and direction of the form. Just to clarify, this stage should be more than just drawing a line down the middle. Keep it general without detail, we just want to find an impression of Stitch.
  • Layer 3 : Construct forms using basic shapes such as spheres and bean/pear shapes. Take your time at this stage and really study the forms carefully. Make sure you put in the construction lines for the form (aka wire-framing). Again, no details at this stage. Refer to W1a homework.
  • Layer 4: Rough drawing, or refined sketch. Add details, resolve any proportion or drawing issues. Double check, triple check, quadruple check if you have to.
  • Layer 5: Clean-up. Get your lines, as well as proportions and forms, to be exactly like the model sheet. Note that all the lines are closed off, unless they're overlapping or connecting forms. No speed lines, no expressive interpretations, stay true to the model sheet in every aspect, this is no longer a sketching stage. Get the final drawing crisp, clean, and refined to a production-ready finish.

*Note* These are the minimum number of layers I require, however you might find it helpful to have additional layers between these to help you resolve your drawings. Remember to check our forms and proportions. Did I mention check your proportions? CHECK YOUR PROPORTIONS!!

Good Luck!

The scan is broken off, but you might want to do it as a single horizontal strip for all 5 drawings.


Here's an additional model sheet for reference.

October 16, 2011

Week 2: Model Sheet Study

Based on everything that we've discussed so far, pick one of the following model sheets and study it. I am not interested in a straight up copy, but rather how you break down and analyze how the character is constructed. Look beyond the lines and find the solid structures beneath the drawing. The goal here is to gain an understanding of the character and not just to replicate a line drawing. DO NOT TRACE!

You don't have to have to copy the exact page layout, what I want is the execution of the principles below on each and every drawing of your chosen model sheet. Make sure that you do these studies using traditional media and NOT digital. Here's a tip: print out your model sheet, use tracing paper to do the first assignment (w1a) on top of it as practice before you engage the actual assignment.

Do the following in this specific order:
  1. Main action if there is one. Good characters will have a clear read on this.
  2. Main forms that the character is made of (head, body).
  3. Secondary forms and how they are attached (limbs, ears, tail, etc).
  4. Squash and stretch of the forms above. Stretch is usually associated with active actions like when a character is dashing or kicking, and squash with more passive actions like sleeping or ducking. It could also means the different between a character being lazy or active.
  5. Double check your silhouette, positive and negative space. You can check by simply by looking at the reverse side or by rotating it. You can also check my measuring the head proportions, however be aware that some forms will be overlapping depending on the pose.
  6. DETAILS SHOULD ALWAYS BE LAST. Details are important, but only after you have solid forms to put them on. Details such as hair usually follow the same rule as above, there will be a main shape, followed by secondary shapes, and finally supported by minor detailing. Determine details in order of importance, it may vary depending on the character. Consider the character's costume, accessories, and props. Again, all these details will most likely follow the same ideas as above.
  7. Actual line drawing after you have figured everything out.

October 15, 2011


Week One Homework, built up with the glorious sweat and blood and suffering of the proletariat.
Aaron Wang - A Drunk Russian Peasant


Week 1 Ass. (cheeky)

October 9, 2011

Heads and Facial Expressions References

Here are some references to help you with the assignment.


Week 1b: Facial Expressions

Now that you've familiarized yourself with constructing a form, lets turn these forms into heads. Use the same head for the entire assignment and vary the angles for different expressions. Remember that you are illustrating an idea, or in this case an expression, so make sure that everything you do is in support of that idea. The character's behavior in relationship to the idea is more important than having a nice form drawing that expresses nothing about the character. It is recommended that you use a mirror to assist you in executing the assignment. Essentially, we want the character to act out these emotions as believable as possible while maintaining the consistency of each drawing. It is to your advantage to create a solid, yet simple, overall form for your character's head instead of something too realistic or complex. Make sure you start by labeling the corresponding word to your character's expression before drawing.

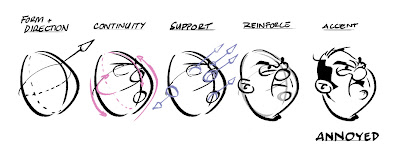
In order of importance:
  1. Idea, story (in this case the word that describes the expression)
  2. Basic construction (see w1a)
  3. Secondary forms/masses and their directions subordinating the main idea
  4. Supporting details such as hair, creases, eyebrows, and accents
  5. External details like accessories, patterns, textures
**Though hairstyle is an important aspect of a character, for this assignment we will not be concerning with it too much. The reason is sometimes hair can be overwhelming and take over what we are trying to achieve.

DO: Create orthographic views for your character's head (front, side, back). Then, do a drawing for each of the facial expression listed below. Obviously there more than one way to describe these expressions, some will have more room for variations, while others will be limited.

happy, satisfied, coy, shy
aloof, confident, ecstatic, goofy
sad, worried, nervous, confused,
tired, exhausted, dizzy, knocked-out
annoyed, mad, angry, frightened
surprised, contempt, ashamed
awe, skeptical, bored, disgusted
wink, smile, laugh, cry, yell
thinking, scheming, focusing

Week 1a: Basic Contruction

Create only simple shapes that are either circular or boxy. The goal of this exercise is to familiarize yourself with creating volume on simple shapes. More importantly, this will help you think about your design as DIMENSIONAL form(s) situated in a SPACE. This is not a design exercise, avoid putting extraneous "limbs" to your main shape, do not shade your drawings. I want to see simple shapes with the qualities below.

Things to look for:
  • volume, mass, continuity, clarity, simplicity
  • center lines in vertical and horizontal axis
  • follow-through, wraparound
  • direction of intersection of the axis (remember to put in the ARROW)
  • maintain the integrity of the shape and form
Things to avoid:
  • flattening of the form
  • unclear direction
  • too much details
  • random organic shapes
  • randomness does not create clarity
DO: 50 circular shapes, 50 boxy shapes, 50 combinations of the two

October 8, 2011

Introduction

Welcome to 2D Character Design!

The purpose of this blog is to create a virtual space for you guys to share your work and resources. I want to highly encourage everyone to upload their work here so that we all can participle in giving feedback and suggestions prior to in-class critiques.

*Note* For easy navigation as the blog grows, please remember to tag your post corresponding to one of the categories below:

projects (assignments, personal project, basically your artwork)
resources (references, links, photos, etc)
bulletin (class announcements, schedules, contacts, lecture notes)

Looking forward to seeing everyone's work soon!

-Khang