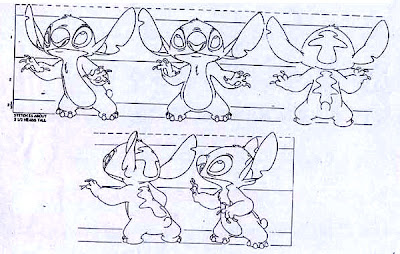
Copy the Stitch turnarounds below by doing each step on a separate layer (of tracing paper). Remember to refer back to the previous exercises to help you execute this assignment. It is recommended that you look at Chris Sander's work for reference as he is the designer for Lilo & Stitch.
Technically you can make a successful copy using a grid and by measuring out the line relationships, so you really just mapping out points in a linear fashion. Conversely, by breaking the drawing down into different stages you can turn a linear drawing into a dimensional and substantial drawing. A lot of time character copies turn out poorly because they are missing the underlying structure on which the character is originally built from. The designer is not trying to trick you, he purposely design it in a way so that it can be translated by a team of artists. It might not be easy, but at least it'll be easier if you have an understanding of what you are replicating. If you run into issues, it's probably because you are going too fast.
- Layer 1 : Draw the height proportion guidelines first. In this case, Stitch is roughly 2.2 heads high with about 1/5th head extending on top and below.
- Layer 2 : Do gesture drawing, look for rhythmic curves, general proportions, and direction of the form. Just to clarify, this stage should be more than just drawing a line down the middle. Keep it general without detail, we just want to find an impression of Stitch.
- Layer 3 : Construct forms using basic shapes such as spheres and bean/pear shapes. Take your time at this stage and really study the forms carefully. Make sure you put in the construction lines for the form (aka wire-framing). Again, no details at this stage. Refer to W1a homework.
- Layer 4: Rough drawing, or refined sketch. Add details, resolve any proportion or drawing issues. Double check, triple check, quadruple check if you have to.
- Layer 5: Clean-up. Get your lines, as well as proportions and forms, to be exactly like the model sheet. Note that all the lines are closed off, unless they're overlapping or connecting forms. No speed lines, no expressive interpretations, stay true to the model sheet in every aspect, this is no longer a sketching stage. Get the final drawing crisp, clean, and refined to a production-ready finish.
*Note* These are the minimum number of layers I require, however you might find it helpful to have additional layers between these to help you resolve your drawings. Remember to check our forms and proportions. Did I mention check your proportions? CHECK YOUR PROPORTIONS!!
Good Luck!
The scan is broken off, but you might want to do it as a single horizontal strip for all 5 drawings.

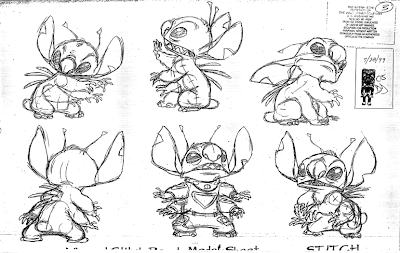
Here's an additional model sheet for reference.

No comments:
Post a Comment